The conflict between land development and tree protection seems to be a losing battle. Oftentimes, a building site has been chosen because of the presence of mature trees. These trees, however, have difficulty surviving the construction process. Although most developers would prefer to save trees on a property, they are often discouraged by past failures or regulations that force them to remove trees to locate utilities. Communication and cooperation among all participants involved in the building process (landowner, contractors, architect, landscape architect, arborist, etc.) is essential to ensure a successful tree-protection plan.
Once you have selected the trees to remain on the property, consider their location in deciding placement of the house, garage, driveway, walks and patio. Simply changing the angle of a building or curving a walk can preserve the essential root space of a prized tree. It is important at this point to be in close communication with your architect, who can help by locating buildings to harmonize with the natural terrain.
The key to the survival of trees in the years following construction is protection of the roots during construction. The three main causes of tree death during construction are soil compaction, grade changes and root severing.
Soil Compaction
Soil compaction cuts off air and water to the tree roots. The damage caused by soil compaction occurs slowly, sometimes not becoming evident for several years. To prevent vehicular and foot traffic around the roots of protected trees, erect physical barriers beyond the dripline of individual trees, or better yet, groups of trees. When this is not possible, other protective methods can be used: (1) spreading several inches of wood chips in the root zone area; (2) bridging root areas with plates of steel. Work with the builder to locate and mark (with signs or flagging) all parking places for workers, construction roads, and areas for storage of building materials, soil and gravel.
Raising the Existing Grade
Grade changes are often necessary during construction of a new building. When the grade around an established tree is being raised, consider methods of preventing injury to the tree before the fill is made rather than attempting to take corrective measures after the damage has been done. While the initial cost may be high, prevention is always cheaper and more effective than attempting to correct the situation after damage has been done.
Remove all vegetation, including underbrush and sod, beneath the branch spread of the tree. Break up the top 3 to 6 inches of soil carefully so as to disturb the least possible amount of roots. This allows better contact between the fill and soil surface. Apply fertilizer at recommended rates.
Construct an open-joint wall of shell, brick, rock or masonry in a circle around the tree trunk, with at least 1 to 2 feet between the wall and trunk. This wall should be as high as the top of the new grade. This opening is commonly referred to as a tree well.
Construct an aeration system using 4-inch agricultural clay tile or 4-inch perforated plastic pipe arranged in five to six horizontal lines radiating from the tree well like spokes in a wheel to a point beyond the branch spread. Allow excess moisture to drain away by installing the radial lines so they slope away from the trunk. Connect the outer ends of the radiating system with a circle of tile or perforated plastic pipe. (See Figures 1 and 2.)

Figure 1. An agricultural drainage tile installation is shown with a dry well and vertical bell tile to provide aeration for tree roots beneath deep soil fill.
To provide vents, place 4- or 6-inch plastic pipe or bell tile upright over the junction of the radial lines with the circle. They should extend to the surface of the planned grade level. Extend the lower end of the aeration system to a curb or storm drain to carry excess moisture away from the root system.
Cover the exposed soil and tile system with rock or coarse gravel to a depth of 6 to18 inches, depending on the amount of fill. Follow this with a covering layer of gravel. Place a thin layer of straw, woven plastic or other porous material over the gravel to prevent soil from filtering into the gravel and stone. Fill with good topsoil to the desired grade.To discourage rodents, fill the tree well with enough coarse gravel to cover the ends of the lines opening into the well. Also fill the upright bell tile and cover with a screen or grill.
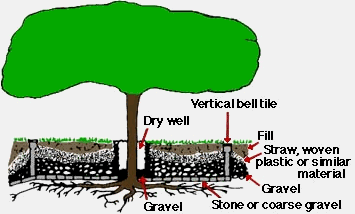
Figure 2. A cross section of a completed fill is shown around an established tree. Soil fill is placed over the ventilating tile system.
The tree well can be left open, covered with a metal grill or wooden deck, or filled with a mixture of coarse sand and charcoal (50 percent each, by volume) to within several inches of the top. If filled with the sand/charcoal mixture, cover with pea gravel, decorative bark or other attractive material to allow air circulation through the tile system.
An alternate method can be used if 30 inches or less fill will be used. No tile or pipe is used – only gravel. Again, remove all sod and underbrush, break up the soil surface above the roots and apply fertilizer at recommended rates.
Starting at the dripline, apply from 3 to 6 inches of crushed stone or coarse gravel. Gradually increase the depth towards the trunk of the tree until it is 8 to 12 inches or deeper within 2 feet of the trunk. The gravel can reach the surface of the fill in the area extending 2 feet around the trunk of the tree. Cover the gravel with a thin layer of straw, woven plastic or other porous material to prevent soil from filtering into the gravel and sealing the air spaces. Spread good topsoil over the area to the desired depth. Use good, well-drained topsoil in making the fill in order to provide adequate aeration for normal root activity and tree growth.
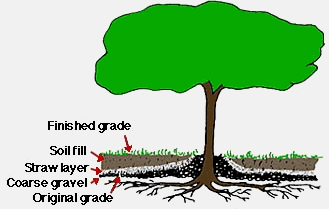
Figure 3. Coarse gravel placed over the original grade will provide aeration for tree roots beneath shallow soil fill.
Figure 3. Coarse gravel placed over the original grade will provide aeration for tree roots beneath shallow soil fill.
Lowering the Existing Grade
There will likely be less damage to a tree when the grade is lowered, unless a great amount of the root zone is exposed or removed. Removing 1 to 2 inches of soil normally will not affect the growth of a tree, especially if steps are taken to ensure that drought damage does not result from loss of roots. Use retaining walls or terraces to avoid excessive soil loss in the area of greatest root growth. When possible, spread mulch over the exposed area to help prevent soil erosion, reduce moisture loss and keep soil temperatures lower. Provide adequate water in the event of a prolonged drought.
Corrective Steps after a Fill is Made
If a fill has been in place long enough that the tree is already showing symptoms of deterioration, there is little that can be done to save the tree. If the fill was made recently, or if serious damage has not occurred, steps can be taken to correct the problem.
If the increase was greater than 12 inches, it will be necessary to install a tile and gravel aeration system as described above, excavating the soil to the original grade.
If the increase is less than 12 inches, remove the soil around the trunk, down to the original soil level, for a radius of 2 feet beyond the tree trunk. Install a dry well around the trunk to hold the fill soil in place. Drill or dig holes every 2 feet beneath the branch spread, starting about 2 feet from the well. Insert a 6-inch tile or plastic pipe and fill with coarse gravel to allow free air and gas exchange to the roots.
Severing Roots
Although some cutting of roots near construction is inevitable, much of it can be avoided with good planning and cooperation. It is not necessary to route underground utilities in a straight line from the street to the house. Careful route selection can often avoid the root systems of important trees. If this is not possible, reduce damage by tunneling beneath the roots. To reduce trenching for foundations, substitute posts and pillars for footers and walls.
Other Problems
Often when grade changes are made the terrain is altered, and there may be a change in how water drains from the land. If too much water drains into a wooded site, trees in that area may eventually die from lack of oxygen. It may be necessary to build a drainage system to maintain the previous amount of moisture that provided natural growing conditions for the existing trees. If sites are deprived of water, irrigation may be necessary to maintain existing trees.
Watch for equipment damage to limbs and trunks, and repair promptly. Chemicals and other products that are often dumped on a construction site can change the soil chemistry, weakening and oftentimes killing trees on the property. To prevent adverse effects on construction site soils:
- Spread heavy plastic tarp where concrete is to be mixed or sheet rock will be cut. These materials raise the pH, causing alkaline soils.
- Do not clean paintbrushes and tools over tree roots.
- Dispose of chemical wastes (paint thinner, oil, etc.) properly. Do not drain these wastes on site.
Para obtener la versión en español de esta hoja informativa, consulte HGIC 1002S, ¿Cómo Proteger los Árboles Durante la Construcción?
Originally published 05/99