Quick Guide: Drip Irrigation in Home Gardens
Primary benefit: Applies water directly to the root zone while minimizing evaporation and runoff.
System options: Soaker hoses, drip emitters, drip-emitter tubing, and drip tape.
Choose a system based on: Garden or bed size, plant spacing, soil type and texture, and water source.
Small gardens and raised beds: Soaker hoses or drip emitters.
Longer rows and larger areas: Drip emitter tubing or drip tape.
Important components: A water source, distribution line, filter, pressure regulator, fittings, and a soaker hose, drip emitters, drip emitter tubing, or drip tape.
Soil-based adjustments: Sandy soil generally requires closer emitter spacing and shorter, more frequent irrigation windows. Heavier clay soil may use wider emitter spacing and longer, less frequent irrigation windows.
Timer guidance: Adjust watering schedules as needed to keep the soil moist but not saturated and to prevent wilting.
Why Use Drip Irrigation in Home Gardens?
Drip irrigation is highly efficient for watering home gardens. Water is applied directly to the root zone, maintaining consistent soil moisture, minimizing evaporation and runoff, and promoting deeper root growth.
This targeted approach also discourages weed growth and significantly lowers the risk of fungal diseases by keeping leaves dry, resulting in healthier plants and substantial water conservation.
Types of Drip Irrigation for Home Gardens
Numerous options are available for installing drip irrigation systems (Figure 1). The size of a garden/bed can help determine which type of drip system is best.
Soaker Hoses for Small Areas
Soaker hoses slowly release water through pores along the length of the hose. Soaker hoses are less precise than other systems, but are the simplest to install as they attach easily to water spigots and other hoses. Soaker hoses are best for irrigating small areas.
Drip Emitters for Irregular Plant Spacing
Drip emitters are inserted into plastic distribution tubing placed along the rows of a garden. Drip emitters are very efficient as they can be inserted at the base of each plant, precisely where water is needed. This type of irrigation is great for smaller areas, areas where plants are spaced farther apart, or areas where plants are spaced irregularly.
Drip Emitter Tubing for Longer Rows
Drip emitter tubing is a thick, durable tube with evenly spaced emitters at 6 to 24 inches. The tubing is placed along a row of plants, evenly distributing water. This type is good for longer rows and larger areas.
Drip Tape for Large Areas
Drip tape is similar to drip emitter tubing, but the tubing is much thinner, making it less expensive per unit. However, it is also less durable. Emitters are evenly spaced from 6 to 12 inches. Drip tape is best for long rows and large areas and is a popular choice for commercial produce farmers of all sizes.
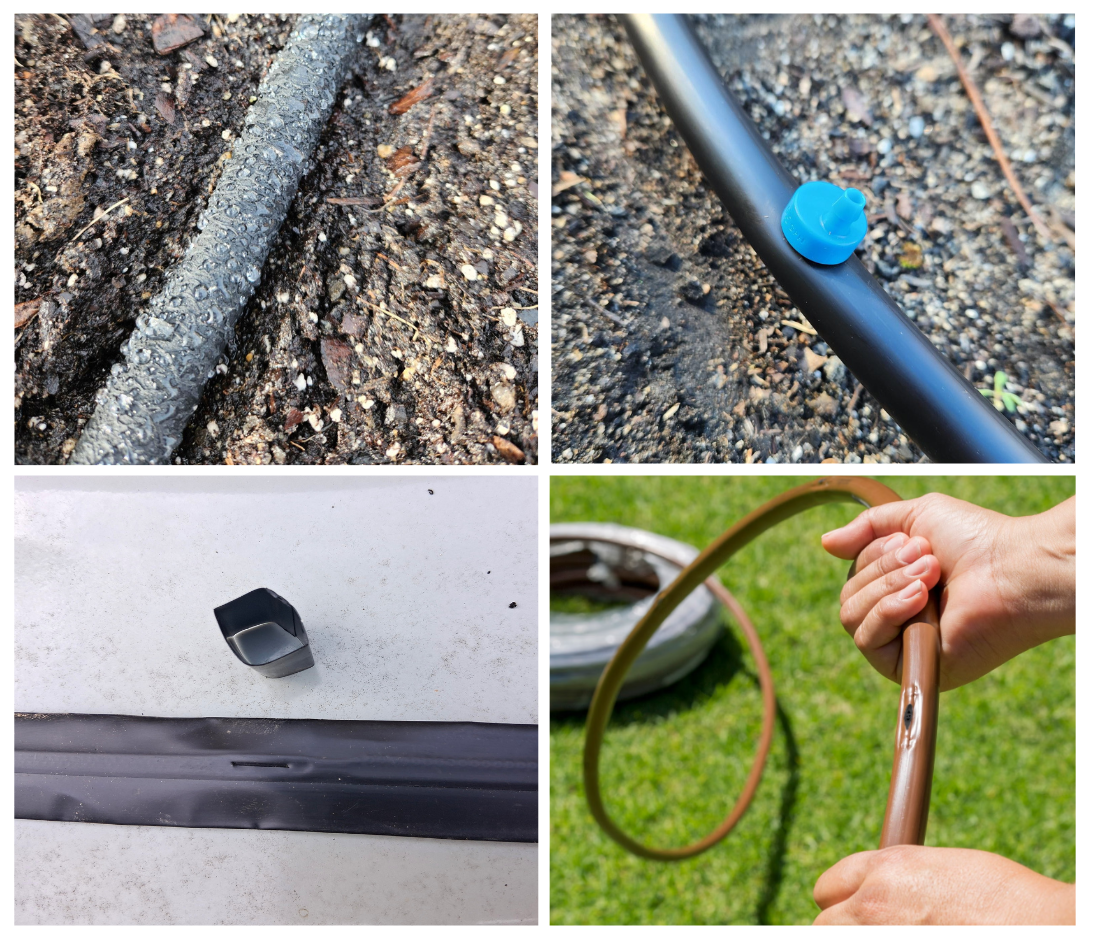
Figure 1. There are several different types of drip irrigation systems. Clockwise from top left: soaker hose, drip emitter, drip emitter tubing, drip tape.
Sarah Scott and Justin Ballew, ©2026, Clemson Extension
Photo of drip emitter tubing courtesy of Rain Bird
Table 1. Compare Drip Irrigation Systems for Home Gardens
| Type | Availability | Quantities | Flow Rate | Best Use |
| Soaker Hose | Most garden centers and hardware stores | 25-250 ft rolls | 0.5-1 gallon/foot/hour | Small home gardens, raised beds |
| Drip Emitters | Most garden centers and hardware stores | Packs of 10-25 emitters | 0.5-4 gph/emitter | Small home gardens, raised beds |
| Drip Emitter Tubing | Some garden centers and hardware stores, Irrigation retailers, online | 50-1000 ft rolls | 0.5-1 gph/emitter | Larger gardens or beds |
| Drip Tape | Irrigation retailers, online | 450-10,000 ft rolls | 0.2-1 gallon/minute/100 ft. | Large gardens, fields |
Choosing Drip Irrigation for Your Home Garden
Plant Type and Water Requirements
Water requirements vary based on plant type.
- Annual fruit and vegetable crops: Require regular watering to promote proper development and prevent wilting. For more information, see Watering the Vegetable Garden.
- Perennial fruit crops: Require regular water during establishment, but less frequent watering afterward. Following establishment, the critical period for water is during fruit development.
- Ornamental trees and shrubs: May only require supplemental water during establishment. For more information, see Watering Shrubs and Trees.
Soil Type and Texture
Soil type and texture are important considerations for selecting drip emitter spacing and adjusting irrigation run times and frequency. Sandy soil, common in the Coastal Plain, holds less water than clay-rich soil, common in the Piedmont region.
Additionally, water drains more quickly in sandy soil, but it spreads more horizontally in clay soil (Figure 2).
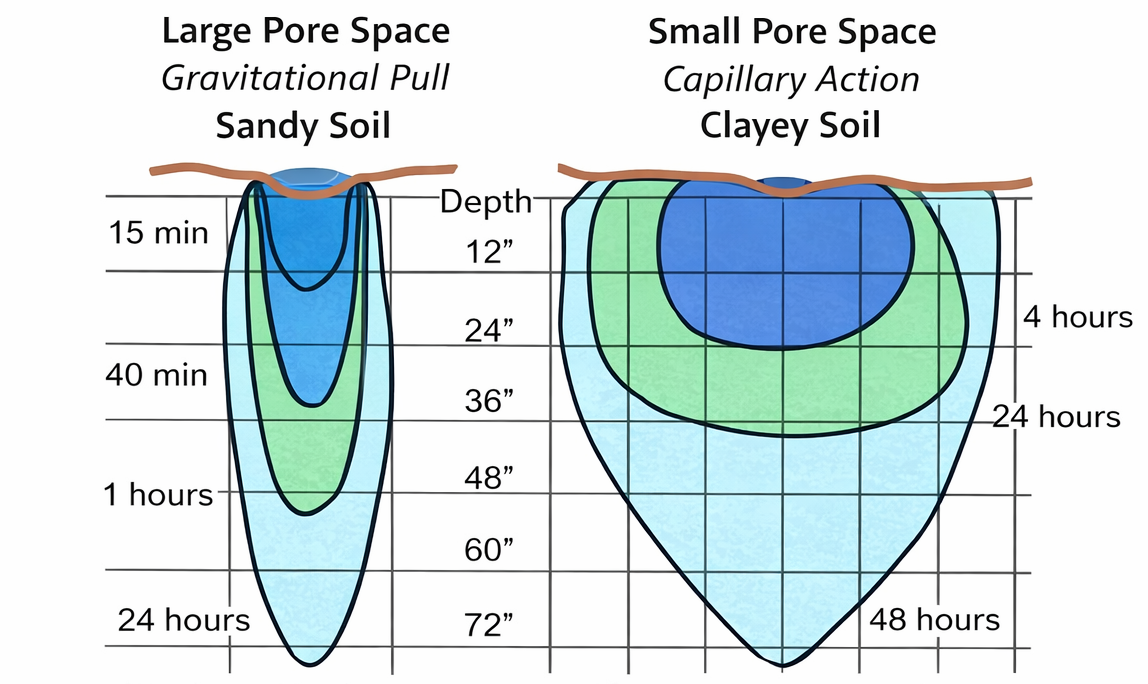
Figure 2. In sandy soil, water tends to move down through the soil profile much faster than in clay. However, water spreads laterally in clay soil much more than in sand.
Image from Managing Soil Tilth: Texture, Structure, and Pore Space by Colorado State Extension. https://extension.colostate.edu/resource/managing-soil-tilth-texture-structure-and-pore-space/?utm_source=chatgpt.com
When selecting drip tape, drip emitter tubing, or determining where to insert drip emitters on distribution tubing, consider the soil texture. Closer emitter spacing is more appropriate for sandy soil, while wider emitter spacings can be used with heavier clay soil.
Table 2. Suggested Emitter Spacing by Soil Type
| Plant Type | Sandy Soil | Clay Soil |
| Annual fruits and vegetables | 6-10 inches | 8-12 inches |
| Perennial fruits | 12 inches | 24 inches |
| Ornamental trees and shrubs | 12 inches | 24 inches |
Due to the limited water-holding capacity of sandy soil, it is usually better to have shorter, more frequent irrigation windows. This will help prevent excess water from leaching out of the root zone.
Longer, less frequent irrigation windows may be acceptable in heavier soil.
Water Source
In residential areas, municipal water is the primary source of irrigation water. In rural areas, well water is more common.
Both sources are acceptable, though municipal water is typically more expensive, making it better suited for small gardens. In most cases, a home garden irrigation system will attach directly to a standard water spigot.
How to Install a Drip Irrigation System
Materials Needed for a Drip Irrigation System
- Timers: Useful in scheduling precise watering times. On/off times can be easily adjusted to meet the needs of individual gardens or crops. Timers are optional, but are great for gardeners with limited spare time.
- Pressure regulators: Needed to ensure that water pressure, whether from a well or municipal source, does not damage the irrigation equipment (Figure 3). Use regulators appropriate for the type of system being installed (25psi for soaker hose/drip emitters, 10 to 12psi for drip tape).
- Distribution lines: Move water from the water source out to the garden/bed. This can be as simple as a garden hose or flexible plastic tubing laid on the ground, or PVC buried underground for a more permanent setup. Distribution tubing for home gardens is most commonly available in ½” and ¼”.
- Filters: Help prevent debris from entering and blocking emitters (Figure 3). While using a filter is recommended for municipal water sources, it is a must when watering from a well. Clean filters regularly to ensure they are not impeding water flow.
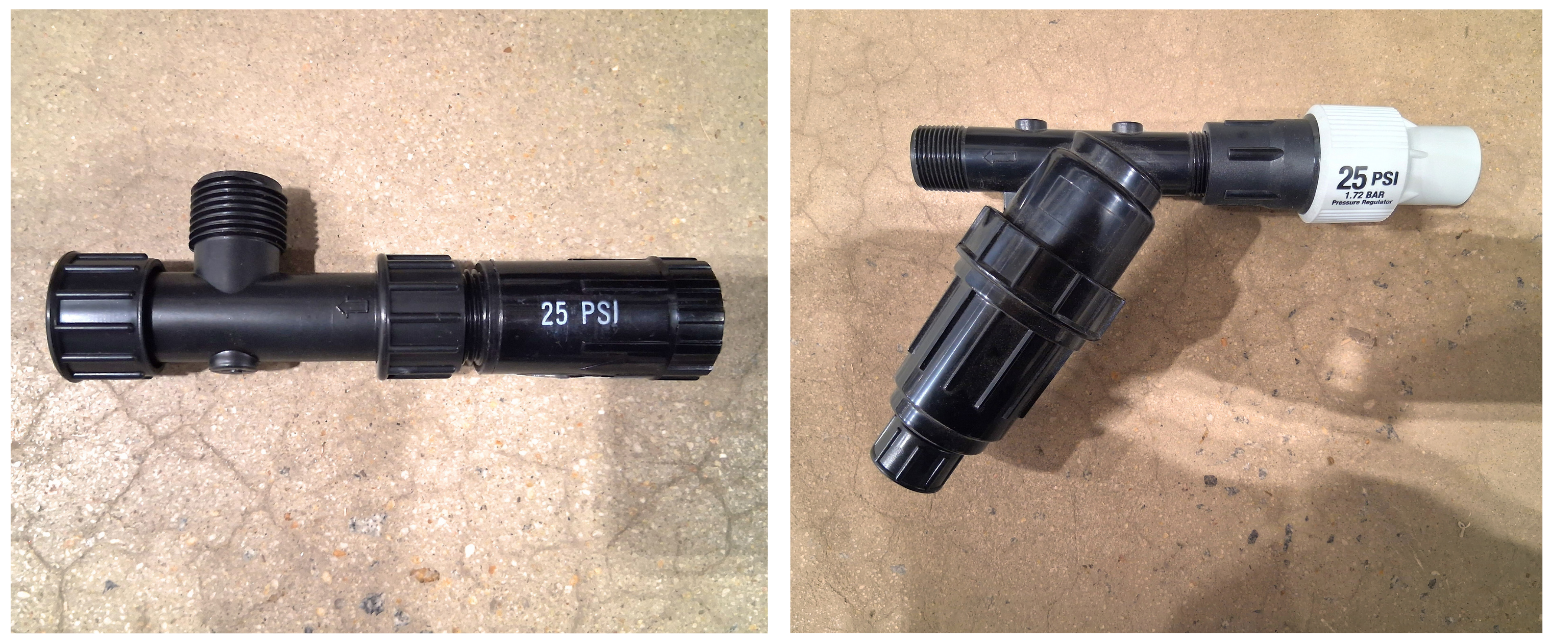
Figure 3. Two different types of pressure regulators and filters are connected. In each photo, the pressure regulator is on the right, and the filter is on the left. Filters and pressure regulators are sold separately.
Justin Ballew, ©2026, Clemson Extension
Fittings for Assembling a Drip Irrigation System
Fittings such as elbows, end caps/goof plugs, tees, couplers, and coupling valves will be needed to assemble the system (Figure 4).
- Elbows: Needed where tubing needs to make a 90-degree turn.
- End caps and goof plugs: Needed wherever tubing or hoses are terminated, such as at the end of a row.
- Tees: Combine 3 pieces of tubing at 90-degree angles to split or combine the flow of water.
- Couplers: Join two pieces of tubing in a straight line. Couplers are also helpful for repairing damaged tubing.
- Coupling valves: Join two pieces of tubing, but also have a valve that can turn off water flow downstream of the valve. These are helpful when multiple beds or rows are connected to the same system but have differing water requirements.
- Adapters: Connect ½” or ¼” distribution tubing to standard spigots.
- Drip tape/emitters/soaker hose: Disperse water to the garden.
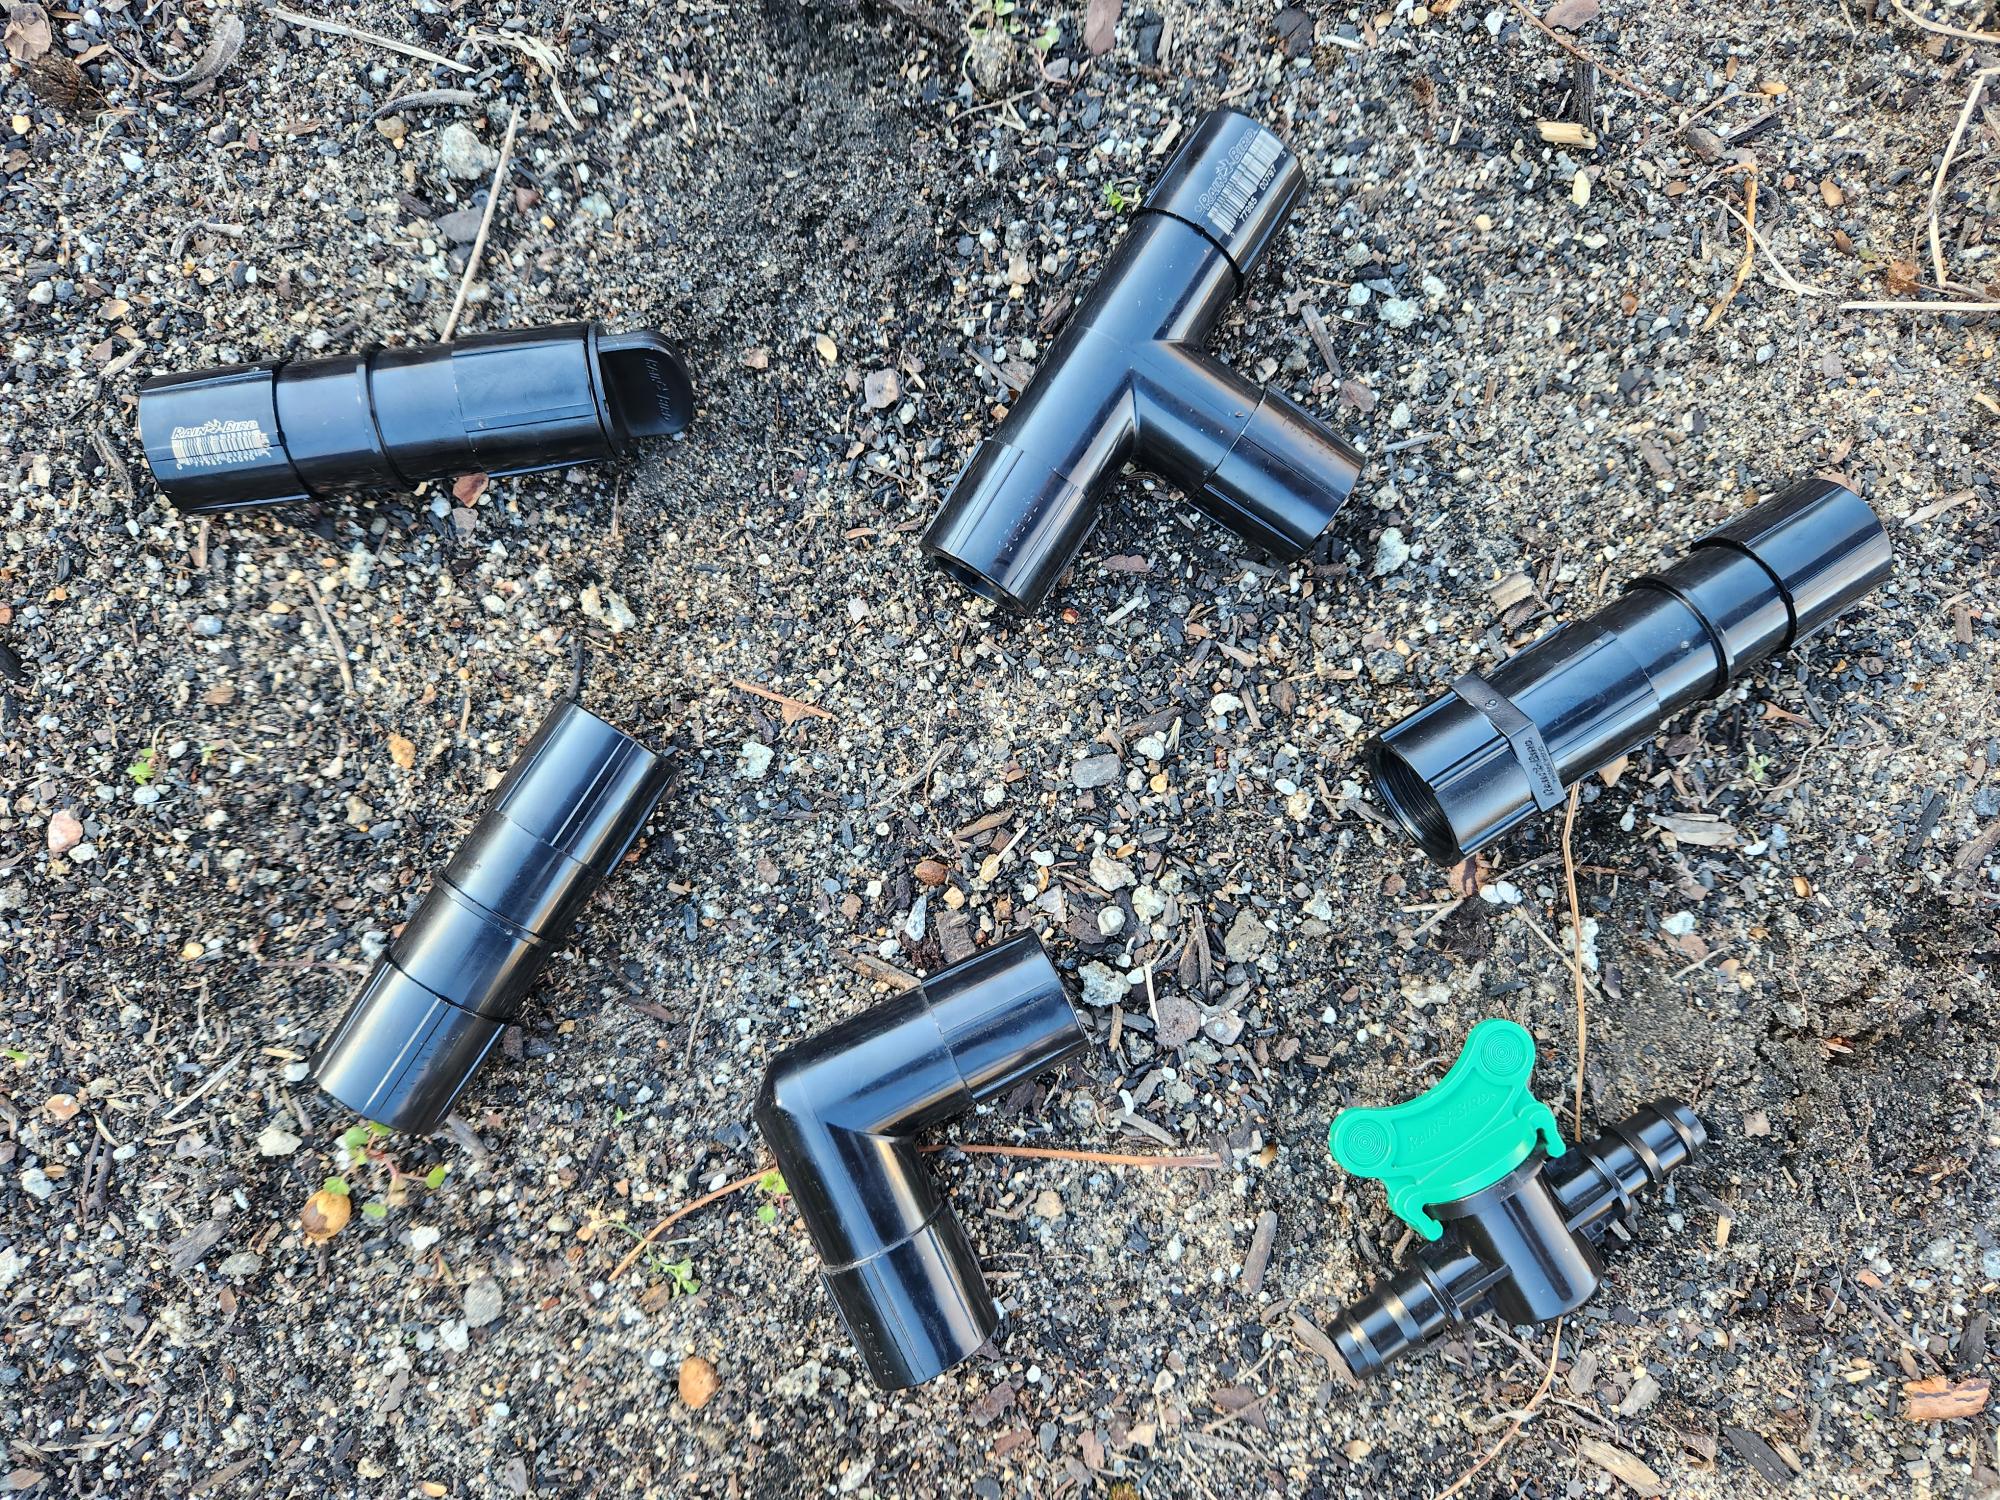
Figure 4. Various fittings, such as elbows, tees, end caps, couplers, coupling valves, and adapters, are needed to install a drip irrigation system.
Sarah Scott, ©2026, Clemson Extension
How to Install a Soaker Hose
Soaker hoses are simple to install as they can be attached directly to a spigot.
1. If a timer is used, it should be attached directly to the spigot.
2. A regular water hose may be used as a distribution line if the garden is not right next to the water source.
3. Many soaker hoses come with a flow restrictor plate inside the hose’s female end (Figure 5). Make sure it is in place before attaching to the timer/spigot/distribution line.
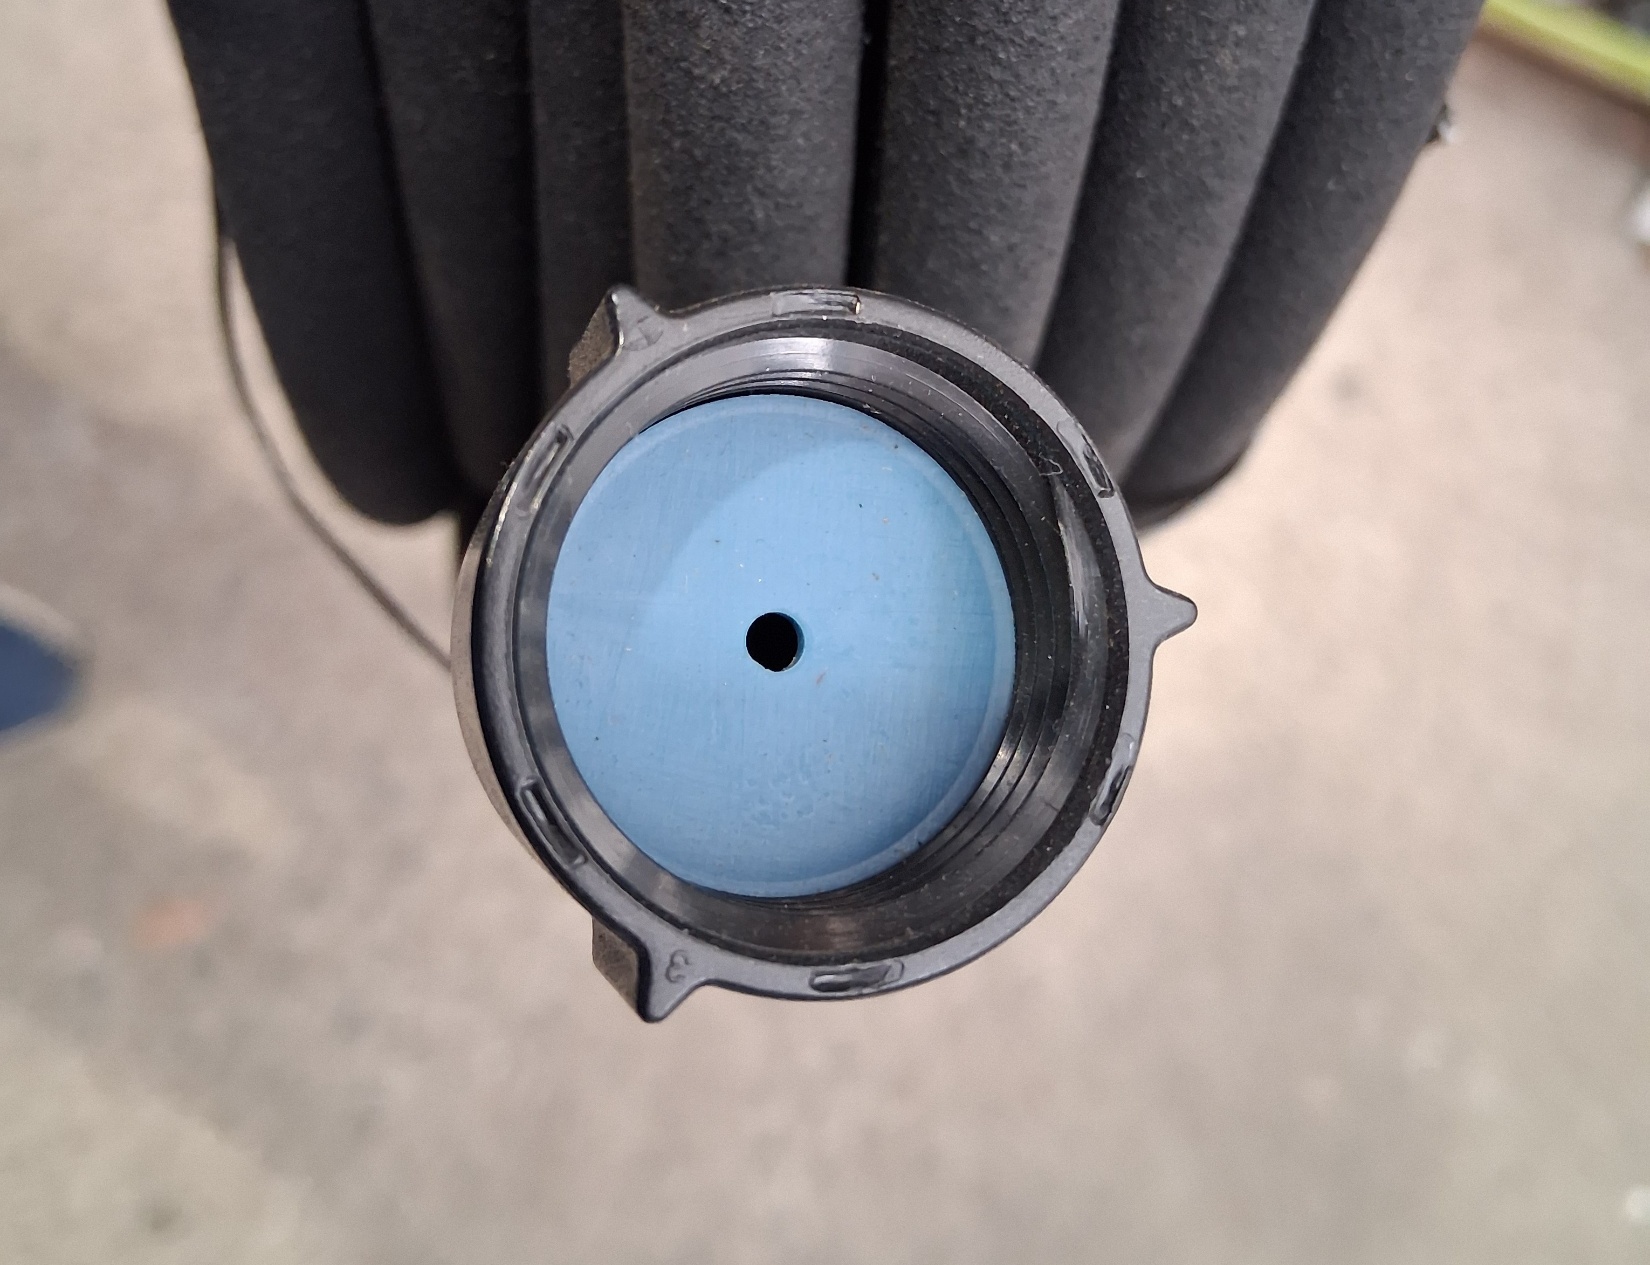
Figure 5. Ensure the restrictor plate is in place before attaching the soaker hose to the timer, spigot, or distribution line.
Justin Ballew, ©2025, Clemson Extension
4. Lay the soaker hose in a serpentine pattern throughout the garden to evenly water the plants (Figure 6). The hose may be staked in place using landscape staples.
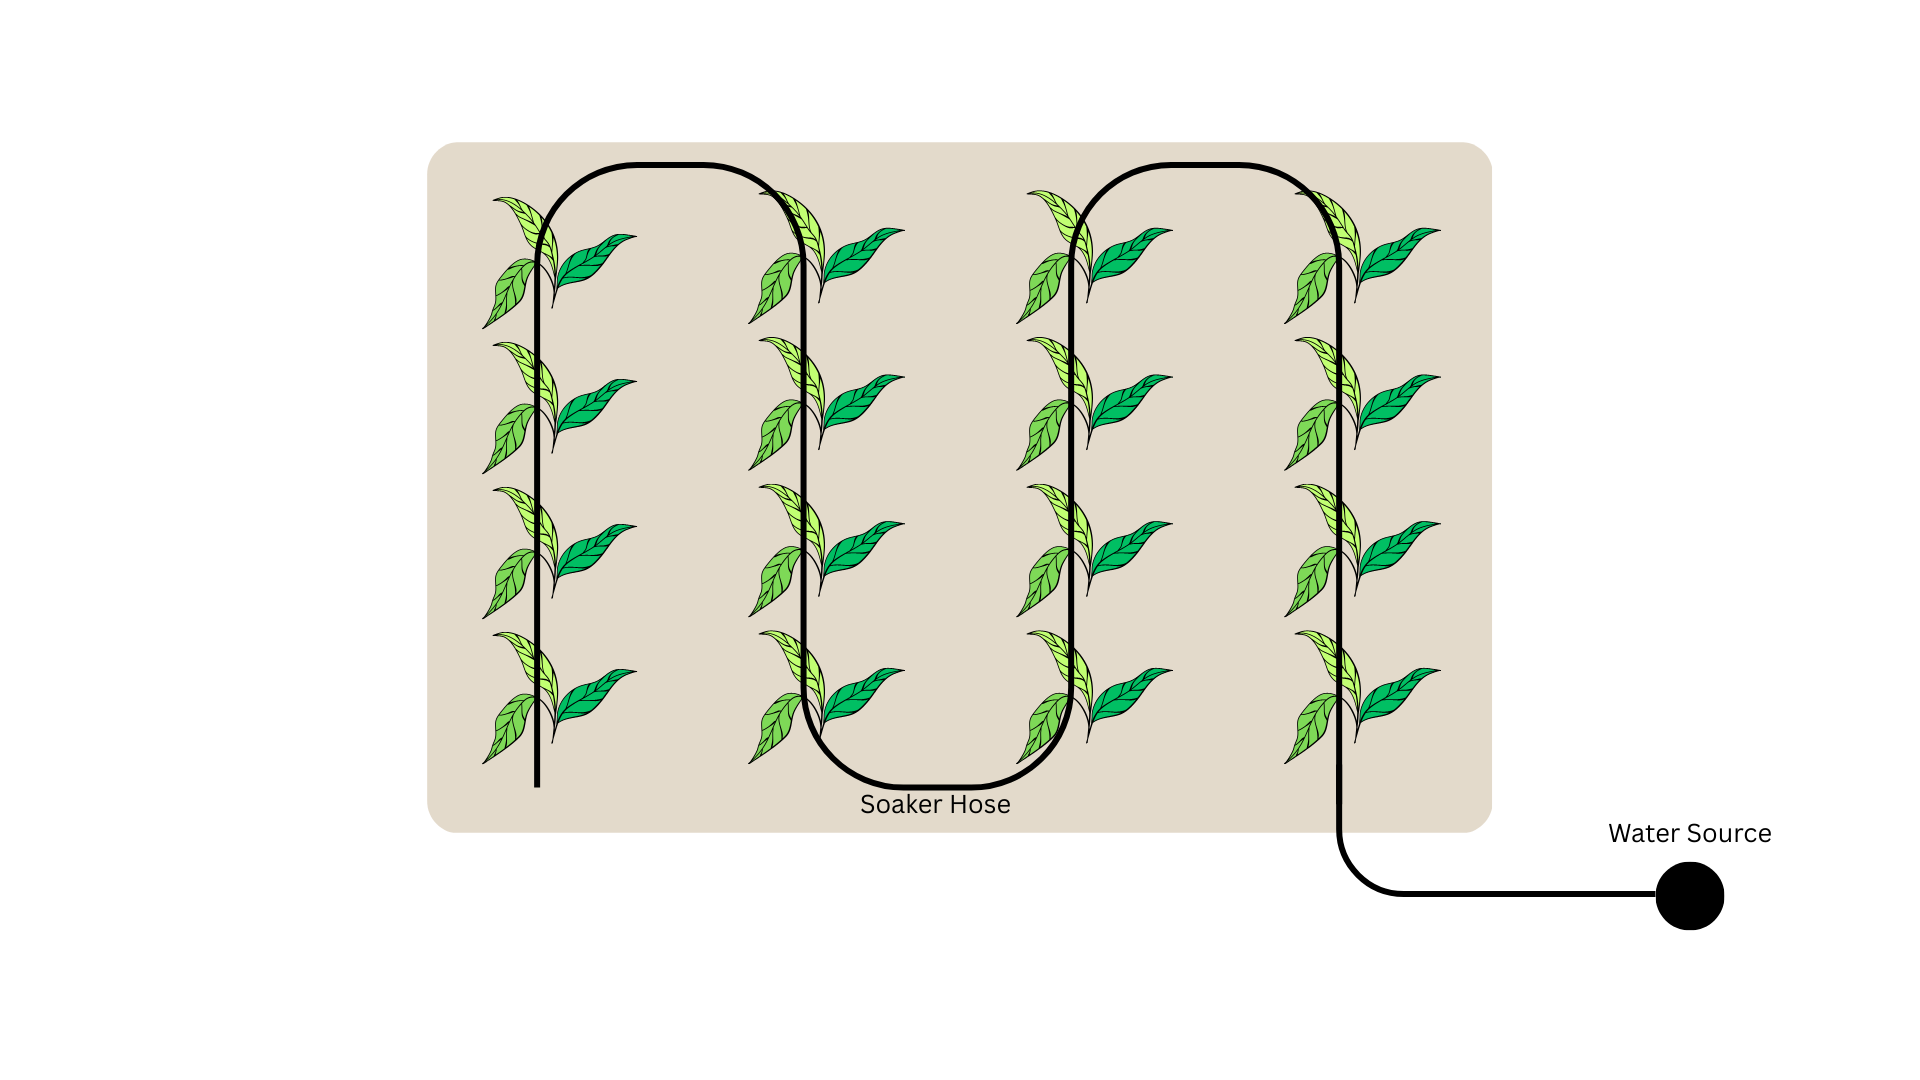
Figure 6. Soaker hoses are laid in a serpentine pattern through the garden, ensuring the plants are watered evenly. Smaller-diameter drip emitter and distribution tubing is also flexible enough to lie in a serpentine pattern.
Justin Ballew, ©2025, Clemson Extension
5. Be sure to cap the end of the soaker hose.
6. It’s a good idea to cover the soaker hose with mulch or straw.
How to Install Drip Tubing and Drip Tape
Drip tubing and drip tape installation often requires a little more care. Like soaker hoses, thinner drip emitter tubing and distribution tubing are flexible enough to lie in a serpentine pattern. Thicker tubing and drip tape should be laid along each row and connected to a main header or distribution line.
- If a timer is used, attach it directly to the spigot, then attach a pressure regulator and filter to the timer’s outgoing side (Figure 7).
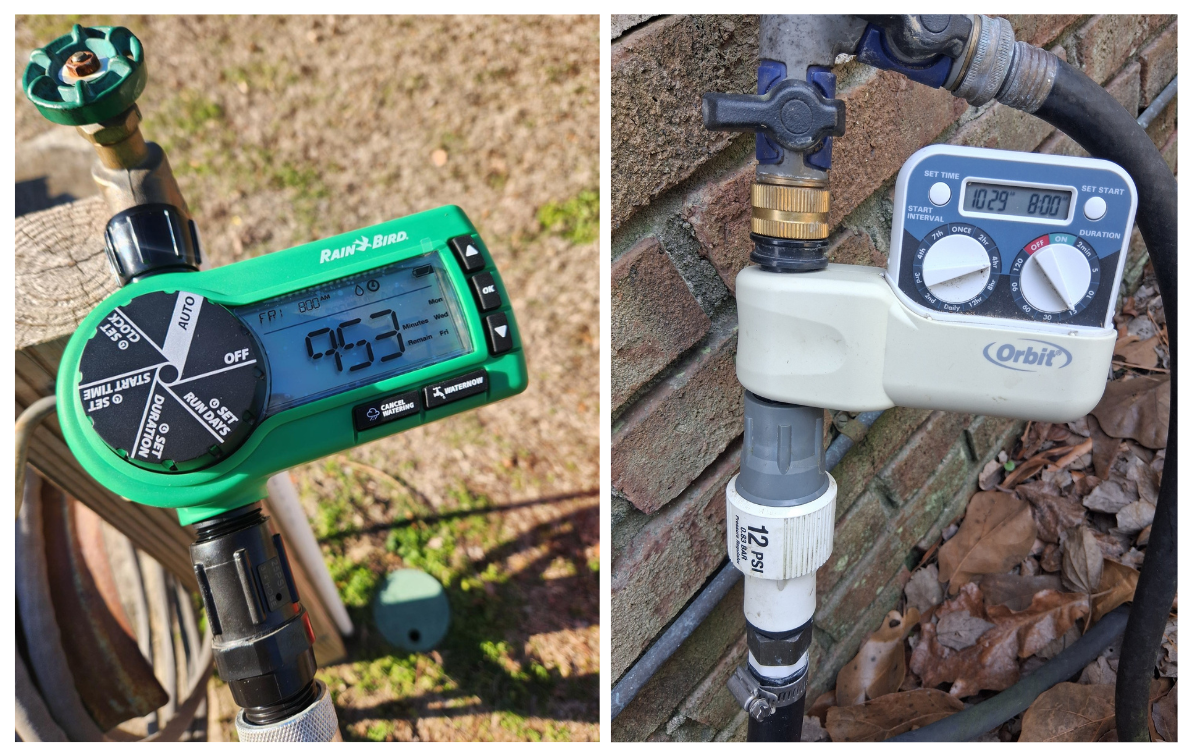
Figure 7. Timers should be connected directly to the spigot, with a pressure regulator on the outgoing side of the timer.
Sarah Scott and Justin Ballew, ©2026, Clemson Extension
2. Next, attach the main distribution line to the filter using an appropriate adaptor and run the line along one side of the garden perpendicular to the rows (Figure 8).
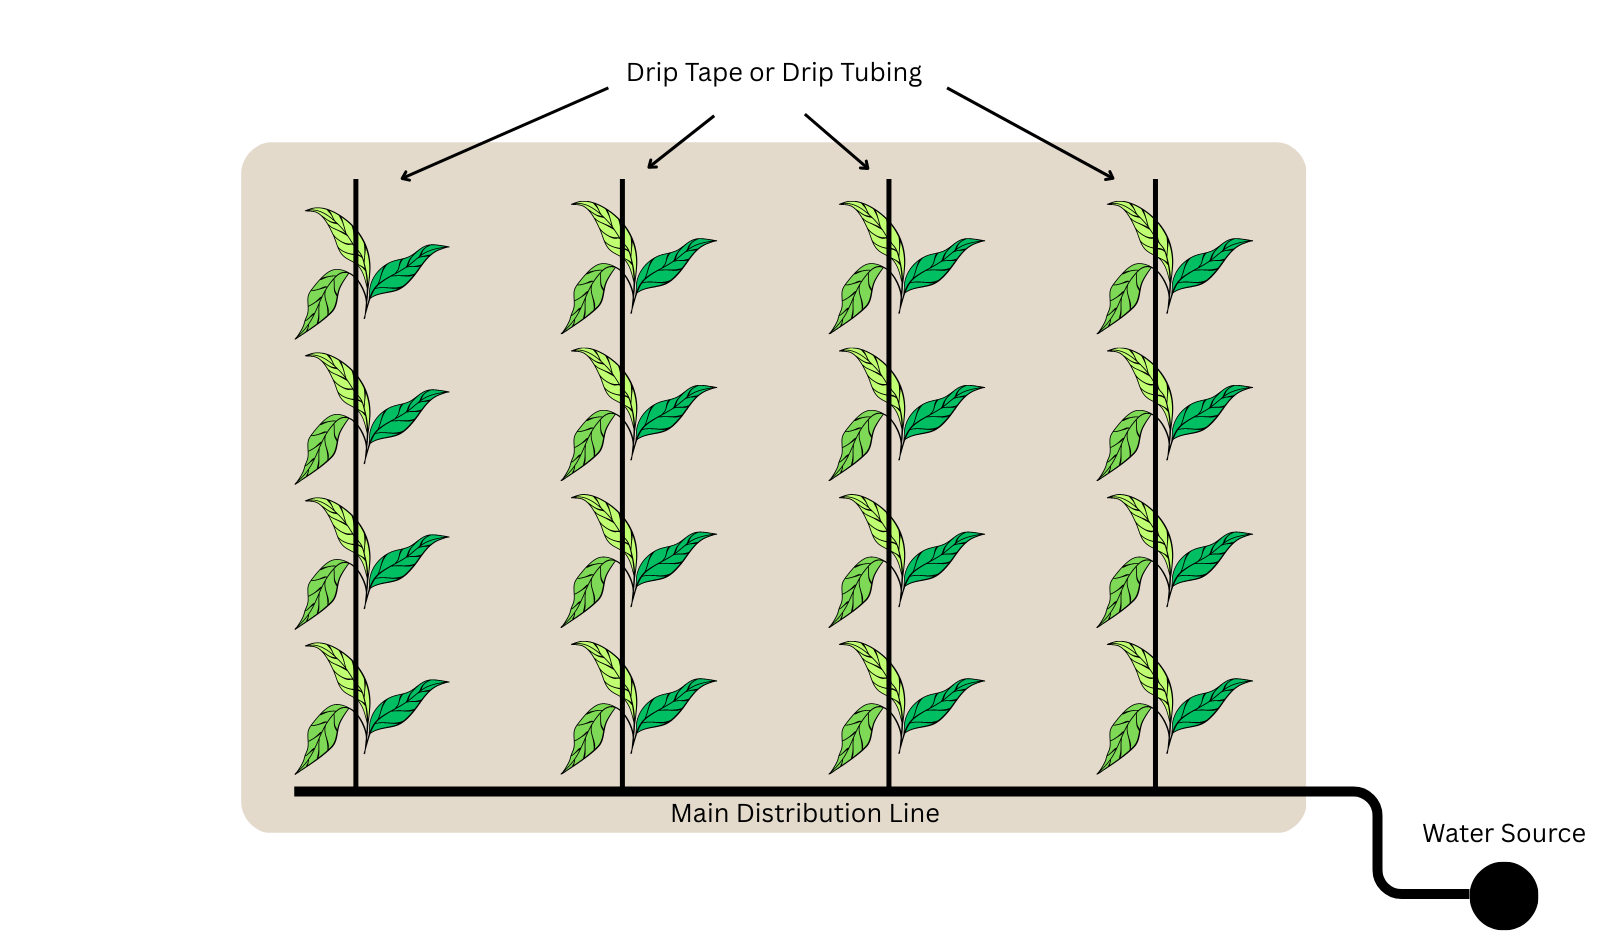
Figure 8. Drip tape and drip tubing layout. Drip tape or drip tubing is run along each row and connected to the main distribution line.
Justin Ballew, ©2025, Clemson Extension
3. Run a piece of drip tape, drip tubing, or tubing for emitters along each row, using tees or barb connectors to connect each line to the main distribution line (Figure 8 and Figure 9).
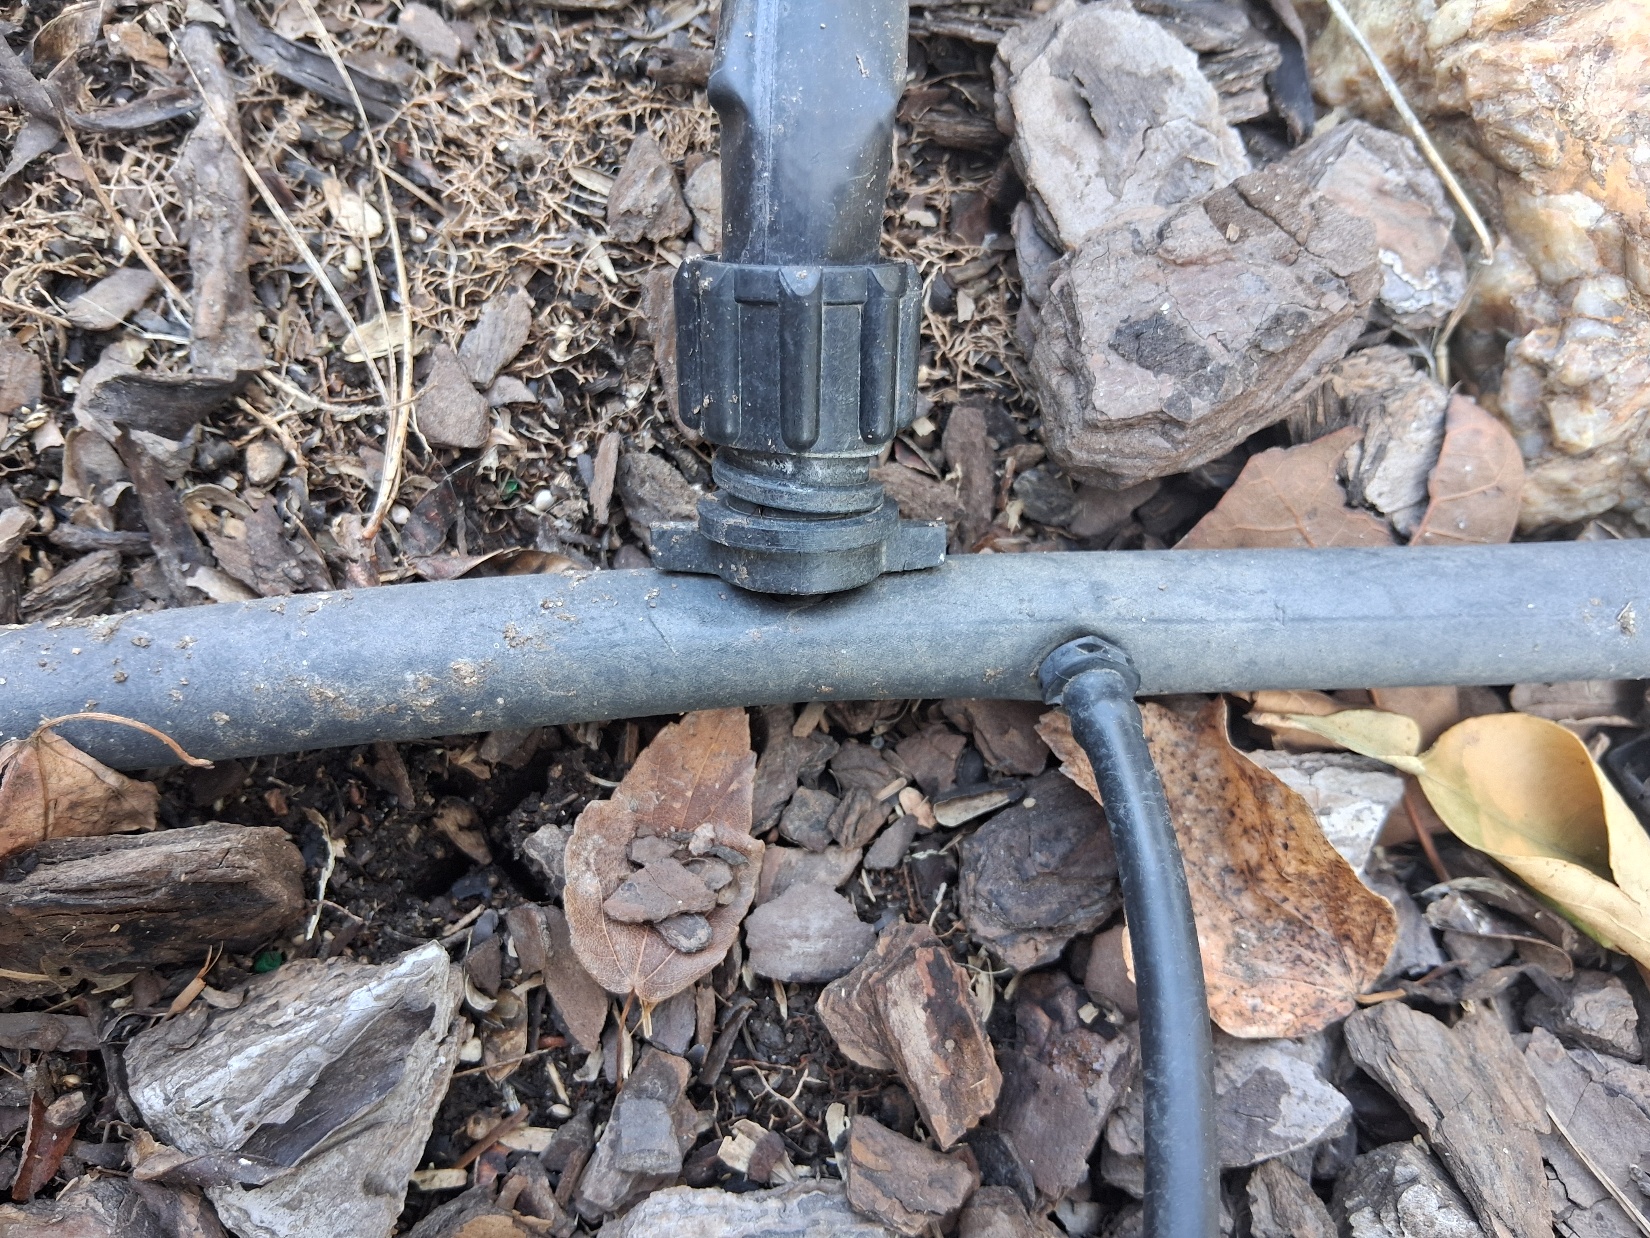
Figure 9. Different-sized barbs are inserted into a distribution line for attaching drip tape or drip tubing.
Justin Ballew, ©2026, Clemson Extension
4. If using drip emitters, punch holes and insert each emitter into the tubing at the desired spacing (Figure 10).
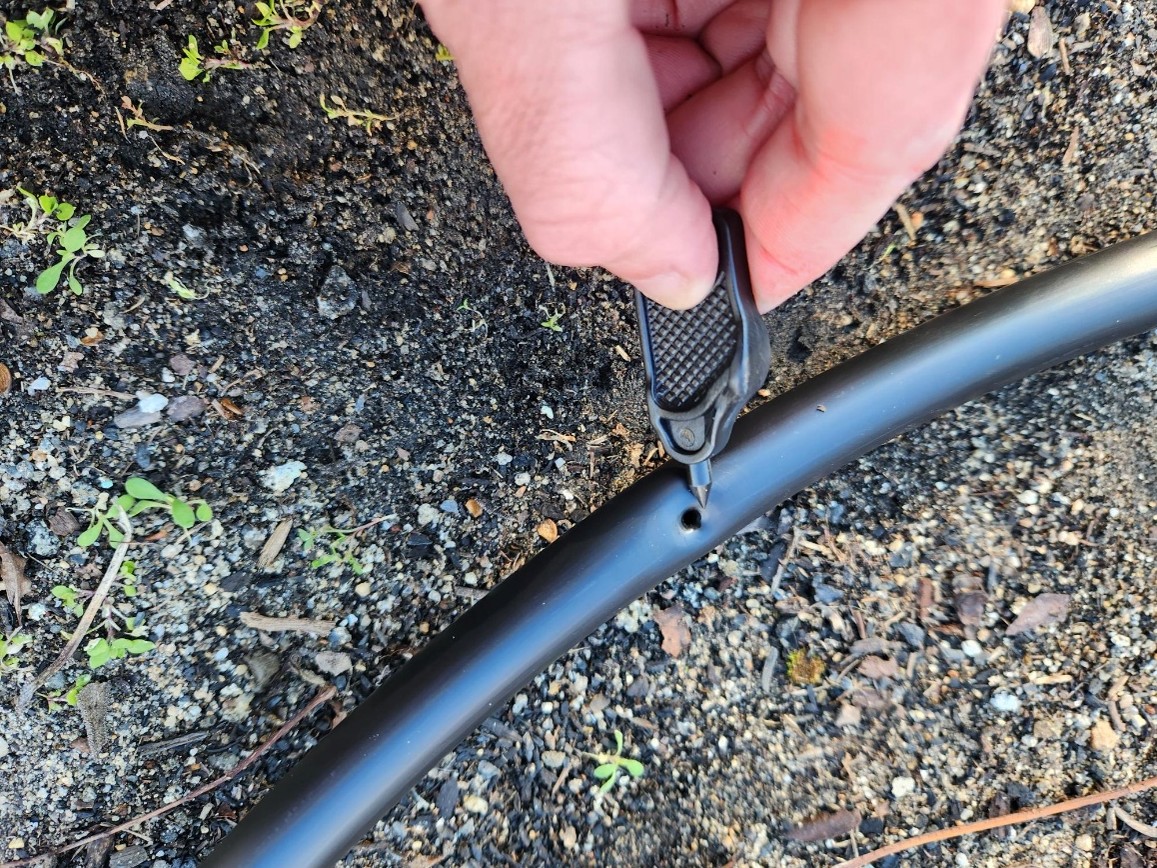
Figure 10. Holes are punched in the distribution line for attaching barbs or drip emitters.
Sarah Scott, ©2026, Clemson Extension
5. Cap the end of the main distribution line and each length of tubing/tape. If caps are not available, tubing can usually be capped by folding it over and zip-tying it (Figure 11).
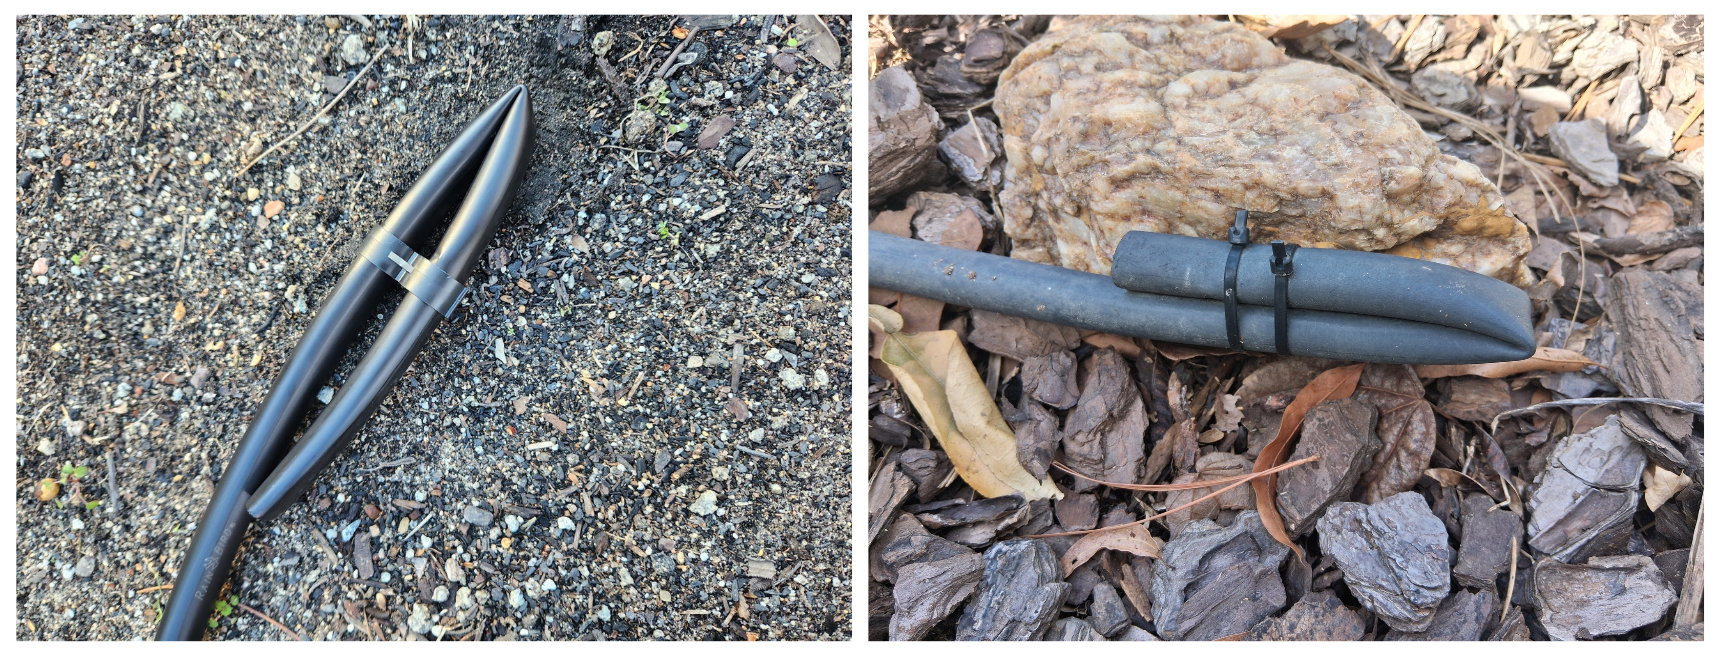
Figure 11. Distribution lines can be capped at the ends or folded over.
Sarah Scott and Justin Ballew, ©2026, Clemson Extension
6. It’s a good idea to cover the drip lines with mulch or straw.
How to Adjust Drip Irrigation Timers
General Timer Adjustment
Adjusting irrigation timers is largely a trial-and-error process and may take a little time to get right. For annual fruit and vegetable crops, aim to keep the soil moist, but not saturated, so that plants will not wilt in the heat of the day. Perennial fruits, shrubs, and trees may only need water once or twice per week.
Timer Settings for Sandy Soil
In sandy soil, annual fruits and vegetables often need water multiple times per day. To avoid excessive leaching, it is usually better to have more frequent, shorter application windows rather than fewer, longer ones.
For example, two 20-minute windows per day are usually preferred over one 40-minute window. To start, schedule a 20-minute window mid-morning and another mid-afternoon each day. Make adjustments as needed to keep the soil moist and avoid wilting.
Timer Settings for Clay Soil
Since clay soil holds more water, annual fruits and vegetables may only need water 2 to 3 times per week. Start by scheduling a 30-minute window mid-morning every other day. Again, make adjustments as needed to keep the soil moist and avoid wilting.
Seasonal Timer Adjustments
Scheduling adjustments may be needed throughout the season as the weather warms in the spring and cools in the fall.
Originally published 10/26