Canning is the process in which foods are placed in jars or cans and heated to a temperature that destroys microorganisms and inactivates enzymes. This heating and later cooling forms a vacuum seal. The vacuum seal prevents other microorganisms from recontaminating the food within the jar. High-acid foods such as fruits and tomatoes can either be processed or “canned” in a boiling water canner or a steam canner (both 212 °F), while low-acid vegetables and meats must be processed in a pressure canner at 240 °F (10 pounds pressure at sea level). Request HGIC 3040, Canning Foods at Home for more information on the canning process.
Water Bath Canner
A water bath canner is a large covered cooking pot with a rack. Any large metal container may be used as long as it is deep enough for 1 inch of briskly boiling water to cover the jars.
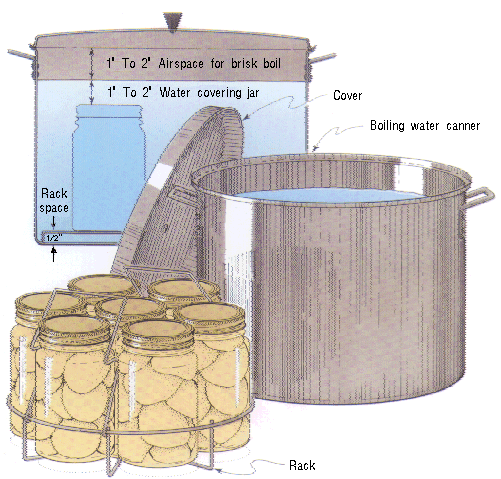
Figure 1. Boiling Water Bath Canner
The diameter of the canner should be no more than 4 inches wider than the diameter of your stove’s burner to ensure proper treatment of all jars. Using a wash kettle that fits over two burners is not recommended because the middle jars do not get enough heat. For an electric range, the canner must have a flat bottom.
The canner must have a tight-fitting lid and a rack. The rack keeps the jars from touching the bottom of the canner and allows the water to circulate freely under the jars. If the rack has dividers, jars will not touch each other or fall against the sides of the canner during processing.
A deep pressure canner can be used as a boiling water bath canner. Just be sure there is enough space above the jars to allow for 1 inch of briskly boiling water. Place the lid loosely on the canner — don’t fasten it. Leave the vent wide open, so that steam escapes and pressure does not build up inside.
Steam Canner
A steam canner must have air vented out with pure seam throughout the processing. Filled jars are processed in a shallow pot. There must be enough water at the bottom of the steam canner to generate pure steam long enough so that the heat of the steam processes the jars. The pure steam reaches 212 °F, the same level of heat as the boiling water bath canner.
Steam canners cannot be processed using water bath canning recommendations Research-based methods specific to steam canning are required for safety. The use of research-based recipes in canning is very important because of the risk of botulism if microorganisms are not destroyed.
Pressure Canner
A pressure canner is a specially-made heavy pot with a lid that can be closed to prevent steam from escaping. The lid is fitted with a vent (or petcock), a dial- or weighted-pressure gauge, and a safety fuse. Newer models have an extra coverlock as an added precaution. It may or may not have a gasket. The pressure canner also has a rack. Because each type of a canner is different, be sure to read the directions for operating your canner and keep them for future reference.
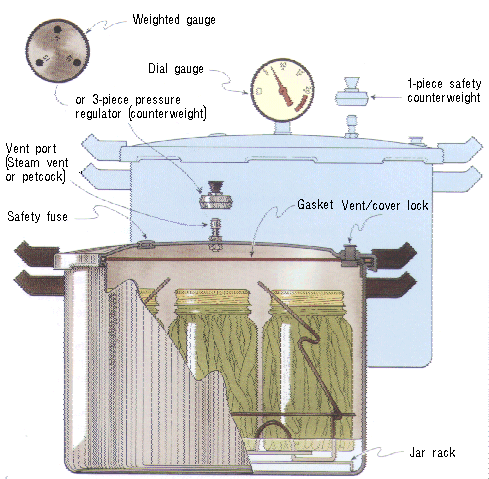
Figure 2. Pressure Canner
Vent or Petcock: This is a short, hollow pipe that sticks up above the canner lid. When open, it allows air and steam to escape from the canner. When closed, it holds the steam inside. On newer canners the vent is closed or opened using a separate pressure regulator weight. On older canners, the vent may be closed using a valve or screw that you can turn.
Pressure Gauge: This registers the pressure inside the canner. A dial gauge will actually show the temperature and/or pressure inside the canner. The weighted gauge will rock gently or make a “jiggling” noise periodically to show that correct pressure is being maintained. Read the manufacturer’s instructions to see how often the weight should rock or jiggle. Some canners have a three-piece weighted gauge that can regulate 5, 10 or 15 pounds of pressure. For 10 pounds of pressure, one piece of the weight is left off.
Dial gauges and weighted gauges actually register slightly different pressures at their same settings. Because of this, dial gauges are operated at 11 pounds pressure up to an altitude of 2,000 feet. At altitudes over 2,000 feet, corrections must be made for dial-gauge canners. Weighted-gauge canners can be operated at 10 pounds pressure up to an altitude of 1,000 feet. At altitudes over 1,000 feet, correction must be made for weighted-gauge canners.
Gasket: This is a rubber or rubber-like compound that helps seal the edges of the canner and lid to prevent steam from escaping. Gaskets may be removable for cleaning or replacement. (Not all pressure canners have gaskets. Some have a metal-to-metal seal.)
Safety Checks for Pressure Canners: For safe operation, the vent, safety valve and edges of the lid and canner must be clean at all times. To clean the vent, draw a string or narrow strip of cloth through the opening. The dial gauge on a canner should be checked for accuracy yearly. Check with your county Extension agent well in advance of each canning season for instructions on how this can be done. If the gauge is off more than 2 pounds at the pressure used for your altitude, replace it. Make pressure adjustments for the difference up to 2 pounds. Follow the manufacturer’s directions for care of the sealing edges of your canner.
Pressure Saucepans & Other Unsafe Models: Small pressure saucepans are not recommended for home canning. Also, outmoded and potentially unsafe pressure canners should not be used. Compare old canners with newer models to be sure that what you have is actually a pressure canner and not an old sterilizer. Before using an old canner, make sure all parts have been checked and are working properly. Buying an old second-hand canner may not be a bargain. Sometimes replacement parts are no longer being made.
Cleaning & Storing Canners
After use, clean your canner, being careful not to immerse the dial gauge on your pressure canner, if it has one. Dry the canner and store it with crumpled newspapers or paper towels in the bottom and around the rack. This will help absorb moisture and odors. Place the lid upside down on the canner. Never put the lid on the canner and seal it.
The darkened surface on the inside of an aluminum canner can be cleaned by filling it above the darkened line with a mixture of 1 tablespoon cream of tartar to each quart of water. Place the canner on the stove, heat water to a boil, and boil covered until the dark deposits disappear. Sometimes stubborn deposits may require the addition of more cream of tartar. Empty the canner and wash it with hot soapy water, rinse and dry.
Canning Jars & Lids
Mason-type jars specifically designed for home canning are best. Commercial mayonnaise jars may not seal and may break, especially in a pressure canner.
Old antique glass canning jars of any type are prized collector’s items. These jars are often too brittle to withstand the heat treatment involved in canning and have a great likelihood of breaking during heat processing. They are best for uses other than canning.
Canning jars come in a variety of sizes from half-pint to half-gallon jars. Pint and quart jars are the most commonly used sizes. Processing times have not been developed for many foods in half-pint, 12-ounce or 1½ pint jars. If the recipe does not specify processing in one of these jars, process half-pint and 12-ounce jars for the same time as pints. Process 1½ pints for the same time as quarts. For jellied fruit products only, pint and 12-ounce jars can be processed for the same time as half-pint. Half-gallon canning jars are recommended only for very acid juices. Jars also come in both the regular and wide-mouth styles. If properly used, jars may be reused indefinitely.
Two-Piece Lids: Most of the canning jars sold today have two-piece, self-sealing lids. This type consists of a flat metal disc that has a sealing compound around the outer edge and a separate metal screw band. The lid is used only once; the screw band may be used over and over, unless it rusts. Do not use any old, dented or deformed lids or those with gaps or flaws in the sealing com-pound. These may not seal. Lids should be good for at least five years after manufacture. Never reuse lids from commercially canned foods for home canning.
Zinc Lids & Bail-Type Jars: These used a rubber ring that fit on the jar’s sealing ledge, but are no longer recommended and are not being manufactured.
Some new imported bail-type jars are available in this country. Many of these are not heat tempered and while these jars come with one rubber ring, no replacement rings are available for reuse. These jars are better used for food storage and decorative purposes than for home canning.
Additional Canning Utensils
The following items are helpful for home canning:
- A jar lifter, essential for easy removal of hot jars from canner.
- A jar filler or funnel helps in packing of small food items into canning jars.
- A bubble freer for removing air bubbles from the jars. This could be any plastic knife or spatula. Metal objects should not be used because they can scratch the glass. Making the jar more susceptible to breakage.
- A lid wand has a magnet on the end to help remove treated lids from hot water.
- Clean cloths for wiping jar rims and general cleanup.
- Knives for product preparations.
- Timer or clock to determine end of processing time.
- Clean towels.
- Cutting board.
A number of other home canning accessories such as corn cutters, apple slicers, decorative labels and special canning spoons are available. Some of these items may simplify the procedures but are not essential. Jar lid tighteners and wrenches are not recommended.
Source: Reynolds, Susan and Paulette Williams. So Easy to Preserve. Bulletin 989. Cooperative Extension Service, the University of Georgia. Fifth Edition revised by Elizabeth Andress and Judy Harrison. 2006.
Document last updated 01/20 by Sydney McKay.
Originally published 11/99